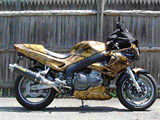
Face the front of your bike and locate the Geza Gear logo on the front of the cover.
Place the left hole over the left mirror base, repeat with right mirror, do not cinch yet. Pull the cover over the front fairing and headlight
making sure you have covered both handgrips and front signal lights.
(DO NOT fit over front fender).
Grasp the rear of the cover and pull over entire rear seat fairing and secure over the edge and sides, making
sure the seat seams are even.
(DO NOT fit over license plate, rear fender of extended signal lights).
Re-adjust the front of the cover over the hand
grip and signal lights. Secure the foot peg straps around each foot peg base. Finally, cinch the mirror holes and adjust the cover to achieve
a perfect fit.
If added security is needed, attach a cable lock through each foot peg strap and secure to your tire or underneath the bike to
the other strap.
For maximum security, run a cable lock down through one mirror hole opening down along your front fork, through your front wheel
and up through the other mirror hole opening. This way the entire front of the cover is locked as well as your front wheel.
First check for rough edges (handgrip screw ends, brake and clutch lever ends, etc.), they must be smooth. DO NOT FIT AGAINST HOT PIPES.
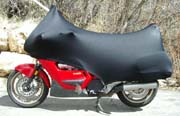
Face the front of your bike and locate the GEZA gear logo on the front of the cover.
Pull the front of the cover over the nose, front fairing, handlebars and windshield. Do not fit over front fender.
Take the rear of the cover and pull over the trunk and or side bags. Don't worry about proper fit yet.
Go back to the front of the cover and pull/stretch the fabric over the windshield and handlebars towards the back of the bike, this will give you extra material to then further pull over the trunk and side bags and also smooth out any material bunching in the front.
Once the fabric is pulled from front to rear and secured under the side bags with the nylon loops (located at the back bottom of the cover), go back over the cover and tug and pull the material so the stretch is equally distributed from front to rear. Make sure there is equal fabric tension around the mirrors and handlebars.
Finally, attach the middle loops over each foot peg and do a final tug to straighten the cover out where it needs. The additional loops around the perimeter of the cover can be used to further secure the cover to your bike when towing.
The cover fabric has "memory" so the longer it stays on the bike the more it conforms to its contours.
Remove the antenna, then put the cover on the bike as instructed below. You will make a VERY SMALL incision in the cover directly above where the antenna screws in. Then, take the cover off and screw the antenna back in. The antennas will now line up perfectly with the cover�s new antenna hole and the hole will not tear, rip, or unravel. Never tow your LT with the antennas bent underneath the cover. This may result in damage to your antennas. Always have the antennas upright going through the cover.
GOLDWINGS:
For outdoor use and for towing, always collapse the antennas underneath the cover and secure the antennas (when towing only) to keep them from bouncing up and down.
Fitting Instructions:
First check for rough edges (handgrip screw ends, brake and clutch lever ends, etc.), they must be smooth. DO NOT FIT AGAINST HOT PIPES.
Face the front of your bike and locate the GEZA gear logo on the front of the cover.
At the front bottom of the cover is a center loop that attaches over the front fender or behind the front fender by clipping it onto the steering damper mechanism. This loop is only needed to assist you in fitting the cover on the first few times or when trailering. Once secured, pull the front of the cover over the fairing, handlebars and windshield. Do not fit over front fender.
Take the rear of the cover and pull over the trunk and side bags. Don�t worry about proper fit yet.
Go back to the front of the cover and pull/stretch the fabric over the windshield and handlebars towards the back of the bike. This will give you extra material to then further pull over the trunk and side bags. It will also help remove any bunched up fabric around the nose to smooth out the cover.
Attach the larger middle loops over each foot peg and connect the rear 2 small straps (located in the rear of the cover) to the inside edges underneath the saddlebags - there is enough of an edge there to secure the straps. Secure to the edges right next to the license plate, so when fastened all you'll see from behind is the license plate. You can also open the saddlebags and secure the loops by closing the bags around them.
The additional loops around the perimeter of the cover can be used to further secure the cover to your bike when towing.
Finally, go back over the cover and tug and pull the material so that the stretch is equally distributed from front to rear. Make sure there is equal fabric tension around the mirrors and handlebars.
The cover fabric has "memory" so the longer it stays on the bike the more it conforms to its contours.
Remove the antennas, then put the cover on the bike as instructed below. You will make a VERY SMALL incision in the cover directly above where the antenna screws in. Then take the cover off and screw the antenna back in. The antennas will now line up perfectly with the cover�s new antenna hole and the hole will not tear, rip, or unravel. Never tow your cruiser with the antennas bent underneath the cover. This may result in damage to your antennas. Always have the antennas upright going through the cover.
Fitting Instructions:
First check for rough edges (handgrip screw ends, brake and clutch lever ends, etc.), they must be smooth. DO NOT FIT AGAINST HOT PIPES.
Face the front of your bike and locate the GEZA gear logo on the front of the cover.
Pull the front of the cover over the windshield, handlebars and headlight. Do not fit over front fender.
Take the rear of the cover and pull over the trunk and or side bags. Don�t worry about proper fit yet.
Go back to the front of the cover and pull/stretch the fabric over the windshield and handlebars towards the back of the bike, this will give you extra material to then further pull over the trunk and or side bags. It will also help smooth out any bunched up fabric around the windshield.
Attach the larger middle loops over each foot peg or shift/brake lever and secure the rear 2 small straps under the side bags by attaching them to any protruding hardware.
The additional loops around the perimeter of the cover can be used to further secure the cover to your bike when towing.
Finally, go back over the cover and tug and pull the material so that the stretch is equally distributed from front to rear. Make sure there is equal fabric tension around the mirrors and handlebars.
The cover fabric has �memory� so the longer it stays on the bike the more it conforms to its contours.
First check for rough edges (handgrip screw ends, brake and clutch lever ends, etc.), they must be smooth. DO NOT FIT AGAINST HOT PIPES.
Face the front of your bike and locate the GEZA gear logo on the cover. Place the left hole over the left mirror down to the base, repeat with right mirror, do not cinch yet. If you have bar-end mirrors, the mirror holes may not line up with them. If this is the case, or you do not have mirrors, the cover may be pulled over the mirrors and the holes cinched up by themselves.
Pull the cover over the front fairing and headlight making sure you have covered both handgrips and front signal lights. (DO NOT fit over front fender.)
Grasp the rear of the cover and pull over entire rear seat fairing and secure over the edge and sides, making sure the seat seams are even. (DO NOT fit over license plate, or rear fender.)
Readjust the front of the cover over the hand grip and signal lights. Secure the foot peg straps around each foot peg base or shift/brake lever. Finally, cinch the mirror holes and adjust the cover to achieve a perfect fit.
Located on the back of the Small and Medium Sport-Classic Series Covers ONLY, is a Sun-Shield Panel. Due to the back of the cover being stretched the most, this Velcro�d piece of fabric will add extra strength to the rear of the cover as well as provide an extra UV barrier to prevent the sun from contacting your rear seat fairing. It is recommended to use the Sun-Shield Panel if the cover will be used in the sun daily. Otherwise, the Sun-Shield panel can be removed. IMPORTANT� Always remove the Sun Shield Panel before towing.
To lock your cover, run a cable lock through one mirror hole opening down along your front fork, passing through your front wheel disk and up through the other mirror hole opening. This will lock the entire front of the cover as well as your front wheel, eliminating the need for a disk lock.


 DO NOT FIT COVER AGAINST HOT PIPES
  Face the front of your bike and locate the GEZA gear logo on the front of the cover.
 Make sure there is equal fabric tension around the mirrors and handlebars.
 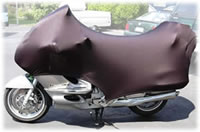 Face the front of your bike and locate the GEZA gear logo on the front of the cover.
 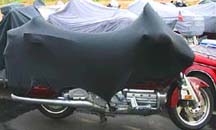 Go back to the front of the cover and pull/stretch the fabric over the windshield and handlebars towards the back of the bike. This will give you extra material to then further pull over the trunk and side bags. It will also help remove any bunched up fabric around the nose to smooth out the cover.
 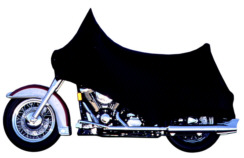 Pull the front of the cover over the windshield, handlebars and headlight. Do not fit over front fender.